Fashion eyes

How to draw fashion eyes

Drawing eyes for fashion illustration differs in various ways from drawing realistic ones. You need to make the eye shape enlonged and with less details. Adding eyes and face details to your sketch will not distract the viewer from your design, but keep his attention and interest. Follow this step by step tutorial and make the presence of your designs stronger.

Step 1 The guidelines

Divide the head in three and mark the middle of the second section.
*If you are not really satisfied with the face shape of your model check out the How to draw fashion facetutorial where you will see additional way to place the eyes correctly.

How to draw fashion eyes step 1

Step 2 Finding the right place

Eyes should never be touching the outline of the face and should be of equal size each. Leave some space from the sides to draw the temples and divide the rest in three equal parts.

Tip: According to the Golden rule between the eyes enough space for a third one should be left. This guarantees you a pretty look. In my illustrations I prefer to leave just a little bit less. It’s just my personal preference.

How to draw fashion eyes step 2

Step 3: Measure how big the eyes are

Mark how wide the eyes are going to be. Remember that in fashion you are looking for a glamorous, sophisticated look. Keep the lines comparatively close to each other.

How to draw fashion eyes step 3

Step 4: slanted lines

Close the eye shapes with tilted lines the way that it is shown.
In this example the right eye will be opened and the left one-closed.

How to draw fashion eyes step 4

Step 5: Shape of the eye

Soften the edges and find the middle of the eye.
For the opened eye draw a curved line coming down, that starts from the Centerline. These curves will give your model a sexy cat look.

How to draw fashion eyes step 5

Step 6: Drawing the pupil

If she is looking straight forward your model’s pupil will be situated in the middle 1/3 of the eye.
Draw two overlapping circles and hide about half of them under the upper eyelid. Fill the inner one with black, leaving a tiny white dot to make the eye come alive.

Tip: If your are looking for more drama and mystery in the face expression of your girl try to hide small part of the circles under the lower lid too.

How to draw fashion eyes step 6

Step 7: The eyelashes

Bold the outline of the eye trying not to change the original form. This will serve for eyeliner and eyelashes. Notice that the bolding of the lower side ends at the eye Centerline and that the upper lashes are a bit longer.
Mark the eyelashes of the closed eye.
In the inner corner of the eyes draw small ellipses ellipses for the tear ducts.

How to draw fashion eyes step 7

Step 8: Details

Add very delicate eyelid detail, draw the eyebrows and finish the rest of the features. Note the lines that mark the temple- you can skip them, but they are a nice finish touch if you’d like.
Eyebrows are very important for the expression of your model’s face. Check “The importance of eyebrows in fashion design sketches” to see different types and variation.

How to draw fashion eyes step 8

Eyeliners and eyelashes

There are many different ways to contour the eye. Here are 10 variations of fashion eyes. Pick one you like the most or get inspired and find your own manner of drawing it.

10 ways to draw eyes

After adding some shading on the face and nice hairstyle your illustration is good to go! You learned the basic technique to draw eyes in fashion sketches. Now it’s time to get creative!

Drawing eyes

Draw folds:collar


How to draw folds for fashion illustrations step bystep tutorial

Learning how to draw fold on the clothes is definitely one of the most important things if you want to master the drawing of fashion sketches. Adding the folds will immediately give your designs finished and professional look and they will look more realistic. Nobody says that you have to show every single fold on the clothes- this is photographer’s work. Fashion illustrator’s job is to be selective and to draw only the most important. Here are some tips…

Step 1: Classic collar

Let’s start with a very simple, classic collar shape. After you have created the outlines of the blouse it’s time to make it look made of fabric, instead of plastic. Look at the outline of the collar. The folds that you’re creating should follow its direction. This blouse is pretty close to the body and the fabric is stretched. This will affect the folds: they won’t be very long and they will be place relatively close to the shoulders.

Tip: The longer the folds are, the deeper they look. The closer to the center they are, the more heavy the fabric will appear.

In the last stage draw a little bit outside of the shoulder’s line. This will give the impression that the blouse is on another, top layer and is not part of the figure.

How to draw folds in fashion step by step tutorial

Step 2: Polo shirt

The folds on a polo shirt would act a little bit differently. Assuming that the model of the polo is not very tight to the body you can leave more distance from the shoulders to the beginning of the folds. Notice how the second fold is not a curved line, but more like waterdrop. This makes it look deeper.
Again, folds follow the collar outline.

Tip: Folds may be in various shapes. They remind straight or curved line: ”( “ “|” and the letters : “Y” “V” “D” “O”. The more opened and curved a fold is, the deeper and bigger it will look.

Since you now have deeper folds this will affect on outline of the collar too. The line won’t repeat the body form, it should be wavy and of course, placed a little bit outside of the neck underneath.

How to draw folds in fashion step by step tutorial

Step 3: Cowl neckline

If you caught the logic in the previous two steps you might already have an idea how to draw a draped neckline.The folds of such neckline are big and deep. This means that they should start at a bigger distance from the shoulders and should look more “opened”. Notice how the folds are not touching each other and how rich in fold forms the neckline is.Folds follow the collar outline.The volume created over the shoulders in the last step should be also dramatic – draw nice, big waves, since the folds are deep and they create more relieve on the outline.How to draw folds in fashion step by step tutorial

Step 4: Accessorized

Let’s say you are designing one shoulder top, hold by an accessory. The accessorory is pulling the fabric and changes the direction of the folds, which would otherwise follow the outline of the collar.Now the folds are spread like sun rises and their form is thinner in the beginning and more opened in the end.
Draw them in various lengths to make the illustration interesting to look at.
In the 3rd stage the outline is deformed, the waves are intensive, more like zigzag- with constantly changing size.
How to draw folds in fashion step by step tutorial

Step 5: Sexy and modest

This is a polo made of elastic fabric. This means that it’s very close to the body and it’s stretched. When you draw slim fitting clothes this doesn’t save you from drawing the folds. They are just more delicate and fewer. Draw tiny folds around the collar without pushing too hard with the pencil. Mark at least one fold from the shoulder and notice how the button is a pressure point-if there wasn’t a button the top would look very different. Emphasize on it.
How to draw folds in fashion step by step tutorial

Step 6: Buttoned up

Here is how you can draw the folds of a shirt or a blouse with buttons. The point where most of the pressure happens is ,of course, the bottoms. By drawing tiny little folds around them you can show that. Try not to overwork with these wrinkles, since the blouse will look like 2 sizes smaller than it should be. Remember always to add volume to the shoulders zone.
How to draw folds in fashion step by step tutorial

Drawing the folds can be a really fun and exciting part of creating your design. Don’t miss is just because you believe it’s difficult. I hope this tutorial showed you that it’s not that hard.
how to draw folds in fashion sketches step by step tutorial

How to use color

HOW TO COLOR WITH COLOR PENCILS FASHION DESIGN SKETCHES INDEX

Color with colored pencils

Colored pencils are the preferred media by many aspiring designers when they create fashion sketches and draw their designs.  Contrary to popular belief colored pencils are not an easy media to color with. Actually they are one of the hardest if you are aiming for professional looking fashion illustrations and portfolio. In this tutorial you will learn a few tips to color with colored pencils that will bring your illustrations to the next level.  Enjoy and have fun!


Step 1: The lineart

This is the most important and unfortunately the most neglected step when drawing fashion sketches and art in general. If you want a great looking illustrations you need to start with a great looking sketch. Take your time to clean up the lines – make everything clear in the drawing. Use a hard pencil (H, HB, B, never anything softer than 2B). This will help you avoid smudging the graphite later when you start coloring.

Tip: Tracing your drawing to a clean sheet of paper using a mechanical pencil is a technique that really helps for polished looking end results.

How to color with colored pencils step by step tutorial

Step 2: Lines direction

You want to start with a solid base color and build up from there. In order to avoid overlaying color and messy look pick a direction and don’t change it. Notice how much cleaner the example to the right looks when the whole illustration is colored in the vertical direction.

How to color with colored pencils step by step tutorial

Step 3: Just fill it in!

What makes the fashion sketches look unprofessional is these white gaps that happen when using colored pencils. It doesn’t have to be like this. Keeping the vertical direction of your lines, build up the color and fill as many gaps as you can. Make sure you go over each part of the sketch at least 3 times. It should start looking almost glossy!

How to color with colored pencils step by step tutorial


Step 4: Color variation

Having a set of 12 colored pencils doesn’t mean you have only 12 colors to work with. By blending them you can create many new tones and rich colors. Add some brown to the red, add some purple to the blue, add orange to the brown and pink to the skin. Don’t overdo this step, but make sure you are not using just the boring out of the box colors – invent your own!

Tip: Usually when two objects of different colors are next to each other they will exchange color variations. For instance: the ponytails is bluer next to the shirt and the shirt has s brownish tint at the shoulder.
Tip: Some blush makes wonders to the skin – it looks fresh and alive. Add it gently to the cheeks, the collarbone, chests, elbows and fingertips. Also the knees and the toes will be slightly pinker.

How to color with colored pencils step by step tutorial

Step 5: Draw the shadows

Add the shadows to your illustration. Use a darker shade of the colors you have already used or create your own by laying down a light layer of black and mixing it with the base color. You no longer need to make all the lines vertical – follow the shapes of the body instead. Notice that the shadow underneath the sleeve is horizontal and the skirt folds – vertical. If you are unsure where to place the shadows the “How to draw skin shadows” tutorial will help you.

How to color with colored pencils step by step tutorial

Step 6: Back to black

Now using a black color pencil make the darkest parts of the shadows even deeper. Less is more here – so think where it would be the hardest for the light to reach.

How to color with colored pencils step by step tutorial

Step 7: Outlines

In “Outlines part I” tutorial the importance of the outlines was examined. A sketch colored with colored pencils is a great example how much outlines can improve the looks of a drawing and make it seem finished. Outline with color pens (not just black!) or with very well sharpened pencils. Make sure the outlines are slightly darker than the base tone.

How to color with colored pencils step by step tutorial


Coloring with colored pencils is a lot of fun, but it takes time and dedication to make the illustration look professional.  If you enjoy using this media hopefully this tutorial helped you improve your art and make even more fabulous fashion sketches!

how to color with colored pencils step by step tutorial for fashion design sketches

Lastly – if you want to avoid the time-consuming process of filling as much gaps as possible (step 2-3) you can make a foundations of watercolor or markers.
If you still find the process too hard – maybe the “How to draw using markers” tutorial is the one for you

Draw Glam hairstyle

How to draw glam hairstyle

How to draw glamorous hairstule fashion sketches tutorialIn this tutorial you will learn how to draw hair. When drawing a fashion sketch the designer is expected to think not only about the design itself but also for the whole styling of the model – this includes shoes, accessories, jewelries and of course- the hairstyle. This is a step by step  technique for creating voluminous, glam hairstyle for your muses. Big lush curls and a lot of glamour – the perfect companion to any design ideas. Have fun!

Step 1: Starting with a nice face

Draw the face of your model. In case this seems challenging try the “How to draw fashion face” tutorial.
Make sure the forehead is not too big nor too short. Add the ears – most of them will be covered by hair, but it always looks better and more realistic if at least small part is showing through.


How-to-draw-glamorous-curls-hairstyle-step-1

Step 2: Draw the hairline

Using the “How to draw hairline” tutorial draw the curved line that defines where the hair starts growing. The hair is going into the forehead at the temples and at the top center part as shown.
This glamorous hairstyle has a lot of luscious volume. Starting from the middle of the temples pull a straight line at about 45 degrees. Connect the two sides with an arch and mark its Centerline. Draw an inclined line to the right of the arch Centerline – this will be the hair parting.

Tip: Depending on how voluminous you want the hairstyle to appear you may go for a bigger or smaller shape at the top of the head. Experiment and find what works best for you.

How-to-draw-glamorous-curls-hairstyle-step-2

Step 3: Hair guidelines

Begin from the hair parting line and draw a curve going through the middle of Centerline, the outer corner of the eye to the middle of the left ear. This will be a sexy, free-falling strand of hair.
>From the center of the 45 degree lines pull down lines that will serve as guidelines for the hair dimensions. Make sure you leave enough distance from the ears to the side outline and mark the hair length with a curved line.

How-to-draw-glamorous-curls-hairstyle-step-3

Step 4: Luscious volume

Finish the sexy strand by drawing identical line over the first one. Don’t make it look too thin and make sure you have gentle variation in the width of the strand. Notice how it is curving behind the hair. It is essential part of a glamorous hairstyle drawing.
Draw a nice smooth strand over the right shoulder of the model. It is covering almost the whole shoulder.
Lastly draw short lines in different lengths from the parting line out. Notice that they are curved, not straight!

How-to-draw-glamorous-curls-hairstyle-step-4


Step 5: Hair outlines

Using the guidelines from the previous steps draw the outlines of the hairstyle. An “S”shaped line usually works best, but you can also come up with your own way of smoothing the angles and giving the hairs a more natural look.

How-to-draw-glamorous-curls-hairstyle-step-5

Step 6: Strands

Erase the unnecessary, distracting lines and start drawing the hair strands. It is important to remember that each strand has its individual, unique width. Don’t make the lines perfectly aligned to each other – play a little bit.
Notice how the thick strand covering the right shoulder is separated by a line. This line is drawn from the hair outline and is not making it to the roots. This gives air to breath to the illustration – avoid drawing all of your lines from one end to another.
The new strands are curving behind the same way as the big ones.

How-to-draw-glamorous-curls-hairstyle-step-6


Step 7: More hair

Draw more hair. Your lines should look flowing, natural and not stiff. Leave enough space between the strands, give them different directions, size, even let them cover each other. Continue to the hair ends in the same spontaneous way.

How-to-draw-glamorous-curls-hairstyle-step-7


Step 8: Little rebels

Some rebel strands will give live to this already glamorous hairstyle. Choose the places that appeal to your eye and add a few thinner hairs. Don’t go wild with this step or the hairstyle will start looking messy.
Finish the ends – make them look nicely curved and not perfectly aligned.

How-to-draw-glamorous-curls-hairstyle-step-8

Step 9: Coloring the hair

Depending on the dominant colors in your fashion sketch choose a hair color that harmonizes well with the rest of the drawing. Fill all the hair with a nice solid color and shade the roots and the ends of each strand as shown.
You need to treat each strand individually! This might take longer to render, but the results will be much nicer.

How-to-draw-glamorous-curls-hairstyle-step-9

Step 10: Highlights

Finish the coloring of the hair by adding highlights in the middle of each strand. Again- you want to treat each of them individually. Consider darkening the roots with a darker pencil – roots always appear darker than the rest of the hair.
Finish the rendering of your fashion sketch.

How-to-draw-glamorous-curls-hairstyle-step-10

Once you master this hairstyle you will be able to draw it in minutes without the guidelines and measurements. Remember that the good styling can bring your fashion sketches to a new, higher level and enjoy the creative process!

How to draw beautiful glamorous hair in fashion design sketches step by step tutorial

Draw curly hairs

How to draw curly hair

How to draw curly hair for fashion sketches and illustrations step by step tutorialThis tutorial will show you how to draw curly hair in few easy steps and tune your fashion sketches with fresh, playful curls. Some outfits just don’t go well with straight hair – explore the steps and give amazing new looks to your fashion sketches!

Step 1: Before you start

Draw the face of your model with all the features. Don’t forget to draw the ears too.
Pull a short vertical line to mark the middle of the head.
How to draw curly hair for fashion sketches step by step tutorial

Step 2: Guidelines

Starting from the Cernterline draw the outlines of the hair. Notice that the shape is indented at the top of the head. Then it follows the form of the head, expands and finishes as an arch at the bottom line.
How to draw curly hair for fashion sketches step by step tutorial

Step 3: Layers of hair

When drawing fashion sketches you have to keep in mind that hair is not a flat surface. It has volume and layers.
Leave some space from the outline and draw a second line repeating the former. This upper layer should be longer, so the hair looks 3-dimentional.
Mark the middle part of the hair with several short, curved lines starting from the Centerline.
How to draw curly hair for fashion sketches step by step tutorial

Step 4: Bottom layer

Erase the unnecesarry lines and draw zig-zag lines covering the bottom layer of hair. Don’t be afraid tointersect the ears – doing so will make your drawing look more natural.
Erase the parts of the ears that stand behind the bottom line of curls already.

Tip: Keep the zig-zags relatively big for now. The bigger the zig-zag, the bigger (and more easy to draw) the curls.

How to draw curly hair for fashion sketches step by step tutorial

Step 5: Upper layer

The zig-zag guidelines for this layer will be following the curve of the outline of the hair. Make at least one zig-zag in the inside of the upper layer.
Notice that the curls guidelines start from the middle part of the hair.
How to draw curly hair for fashion sketches step by step tutorial

Step 6: A-side curls

As mentioned above, hair even in fashion sketches, has certain dimention. So does every single curl. Using the ziz-zag guide draw parallel line with curved end, as shown in the example illustration. Fill all the curls this way.

Tip: It is less likely to get confused which one is the A-side if you start from the bottom and draw up towards the Centerline.

How to draw curly hair for fashion sketches step by step tutorial

Step 7: B-side curls

Once you have filled every left-to-right part of the curls it’s time to make the B-part. Use exactly the same technique and draw all the curls.
Draw the tips of the hair thining at the end.
How to draw curly hair for fashion sketches step by step tutorial

Step 8: Bottom line

Use wavy line to fill the gaps between the curls ends. Remember to follow the guidelines from step 2. Hair has volume- show it, leaving the upper layer slightly longer than the one that goes behind.
How to draw curly hair for fashion sketches step by step tutorial

Step 9: How to color curly hair?

Cover the whole hair with a flat layer of color of your choice.
Then take a darker shade and render the whole A-part, except for its center.

Tip: For additional realism you can fill ONLY THE MIDDLE of the B-part with white to make the hair look shiny.

Darken slightly the part of the hair, since the hair is always darker in the roots.
How to draw curly hair for fashion sketches step by step tutorial

Using the same technique, but changing the size of the zig-zags you can have very different hairstyles for your fashion illustrations. Try mini, regular and big curls!
Drawing different types of curly and fizzy hair for fashion design sketches

You just learned how to draw beautiful curls in an easy way. It’s time to get creative and design some hair accesories and jewelries!

Girl with curly hair fashion illustration by Teya Bozhilova


It doesn’t look right! Common mistakes:

How to draw curls error 1 How to draw curls error 1 fixed

Error 1: The distance between the parallel lines is too little. Make it wider- at least 1/3 of the next zig-zag segment

How do you use color

how-to-use-colors

The meaning of colors

Today I’ve been thinking about color – how do we use it in our fashion sketches to communicate different messages. Is our art becoming limited by working with the same color palette every time? How color changes the meaning of an artwork?

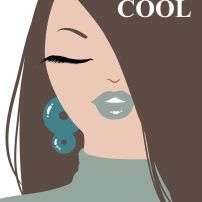
I did an experiment coloring the same image in different colors. In all the variations the skin and the hair are in the same neutral tone and the only thing that is changing are the blouse, the lips and the earing of the model. Yet the message that each of these drawings communicates is unique and so different from the rest.

It was a fun thing to do in a lazy afternoon and it reminded me the importance of using the right colors. Color is essential part of creating a fashion design that tells a story. Here is a list of the meaning of some of the most popular color combinations that might help you with your next project:

Green + Orange/ Yellow : Fresh

Blue + Green/ Gray : Cool, Masculine

Purple + Brown : Mature

Red + Yellow: Flashy, Sexy

Pink + Baby Blue: Sweet, Cute

Golden/Silver: Luxury

Yellow + Orange/Brown: Warm

Black + Blue/Red: PowerfuCOOL